

Vacuum Coaters: Understanding the Market
At A&J Mixing we have put together this guide to aid you in your purchase for your next vacuum coater. In this guide you will learn about many things including:
1. Why there is conflicting information in the market.
2. What vacuum coating is and the differences between vacuum coating & mixture.
3. How to measure quality
4. Moisture loss and how to track it.
5. Where to put your vacuum coater
6. What we do with your information moving forward
We hope you have found this useful, and we are always available to answer questions. The intent is to give you useful information, and there may be statements that are not true in all circumstances.
Why There Is Conflicting Information In The Market
In 1995, “they” said the best place for the coater was after the dryer “because it absorbs better”. In 2006, I was told the same words after a customer moved our machine from being after the cooler. “They” is a powerful force all over the world. And it is difficult for one vendor to suggest some changes. This Guide might also be called “the mistakes we have made and what we wouldn’t do again”. The conflicting information and perception in the market originates with the fact that the extruder companies have a fountain of knowledge on how to make many diets, while the vacuum coater suppliers are more machinery manufacturers whose knowledge is related just to coating and mistakes we have made. Among all of us, there is little if any exchange of knowledge because we think we have a competitive edge that we don’t want to give up. The double rotor paddle mixers are the best devices to use because they will coat the entire surface given enough liquid. The operation is to use vacuum to remove all the air from a porous pellet, coat the surface and let atmospheric pressure push the oil inside. If the pellet is not completely coated, then air takes the path of least resistance leaving liquid on the surface. Another part of the puzzle could be that potential purchasers don’t have real facts about their operation such as what the real temperature is when ready for coating. The importance of this is potential moisture loss and what to do to prevent it. Part of this also is because we don’t ask enough questions particularly when language is a perceived problem. This Guide is intended to answer the questions and explain why we need information.
What vacuum coating is and the differences between vacuum coating & mixture.
Vacuum coating or vacuum infusion is using atmospheric pressure to push liquids inside the pellet. You need to use it when the level of liquid is high enough that you cannot go straight to packaging because it wicks or pools in the bags. Some examples of that level could be 8% on cat food, or 12% on dog or fish feed. The coater is generally placed inline with the extruder, after the dryer or cooler, and has to coat atmospherically as well. Between 5 & 10% generally we can make a good appearance. Below 5% may start to get spotty or what we call the “salt & pepper effect”. The appearance does not affect the quality, because when you are not getting all the surface coated, you just don’t have enough liquid. I will concede we may get a worse appearance than a reel because we are taking what liquid you have and applying it over the entire surface, where a reel may just put it on the sides. Just to apply some judgement, if you had one solid piece, like a rock, that weighed the same as your batch, would the liquid called up by the nutritionist be enough to paint it with a brush? If it is, we will try to do it in our mixer. A myth is that vacuum will help appearance inside and out. Myth is that pigment will make pellets look the same inside. The reason for this has a simple explanation: mixing is randomization, conditioning is randomization, therefore there is randomization in the pellets. The moisture is also random. There is nothing in a vacuum coater to overcome this randomization of the starting product. There are things that can be done to improve outside appearance. With the double rotor mixer we are using high particle movement for mixing and also distributing the liquid. If the liquid will stay on the surface for just a few seconds, we can spread it around. If it the pellets are cool, it slows the absorption. The other option is to slow down the application of liquid. All particles pass a given point every 6 to 10 seconds, so if you hold a spray in multiples of that, say 20 to 30 seconds, then you can hit all the particles directly. We have had instances where we have had to spray for over a minute to get good appearance. A system needs flexibility. You cannot use atomizing sprays in these mixers because there are too many air currents during atmospheric coating that deposits liquid on the walls of the mixer and not on the product. Under vacuum, atomizing can cause evaporation. You will see a measurable amount of liquid exhausting through the vacuum pump and it should be piped outside or to a sump. If you are seeing more than 6 litres per shift per year, then I would suspect the method of spraying.
How to measure quality
A quick measurement is to weigh 6 samples of a given size and calculate the standard deviation and coefficient of variation (Cv.). A Cv of 5% is considered statistically perfect, and if you have up to 7%, you have excellent product. The other way, of course, is to do a fat content analysis. We know the techniques mentioned under heading 2 work. We did an installation in England applying 5% fat and 22 grams per tonne of enzyme. The enzyme was cut 5:1 so we had about ½ liter to spray. We put it through one nozzle in the center and toward the end of the mixer. The nozzle was sized to hold a hydraulic spray (not atomized) for 20 seconds. BASF did the acceptance analysis and had a Cv. of 6.4. (Test report is available.) To show this in another context, if you prorate the surface area to be equal to a U.S. football field, then the liquid would be equal to eight 8 oz. (240 ml) glasses of water. We spray the 8 glasses onto a foot ball field, and take 6 samples the size of a sheet of wall board, and the variation among them was Cv. 6.4.
Moisture loss and how to track it.
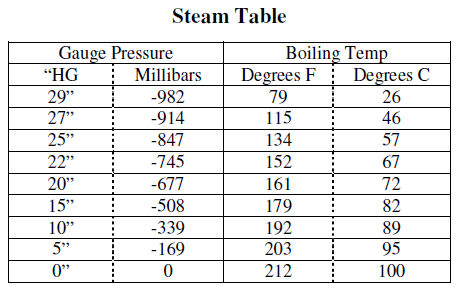
Loss of moisture is dependent upon availability of the moisture, temperature, and level of vacuum, and time. When salmon feed, for example, is dried to 6% moisture content, this moisture is bound in the ingredients. What you have removed in the dryer to get to this level would be free moisture. It takes a lot of time and energy to remove bound moisture. Vacuum is the least efficient drying method and is usedonly on temperature sensitive material or for liquid recovery. The following table shows the effect of vacuum on boiling of water:
 Steam Table
This table defines the physics which we cannot change. The availability of moisture you already take care of in your dryer. We can change the other factors. In our systems with the coater after the dryer, we have seen a significant drop in temperature by the time it reaches the coater. We have a pet food system where the kibble arrives at the coater at 60-65°C after exiting the dryer, conveyed back up,screened, and we are holding two batches in the feed hopper. This is in the Canadian climate. If we use vacuum to -800mb, we are at the boiling point of water. But what we do is have the fat/oil ready so when we reach vacuum there is only a few seconds until we dump the fat/oil in. Typically fat is 45°C. What we have done is eliminate the time factor. If you wanted to go the -900 mb, it would take about 10 more seconds. Time is still not significant. We are the people who like to weigh the pellets in the mixer and weigh the liquids. On the above system we created a spread sheet, put in the actual weightments with a total, and weighed again before discharge and showed the variance. There is always some scale error, and the variance we are getting is so small that it is considered scale error. There are not many systems to our knowledge set up to track like this. The claims of moisture loss could be caused by confusing condensation as moisture loss. I had this explained to me one day after I thought I saw puffs leaving the pump. I did, but they were puffs of smoke from the oil because the exhaust filters needed to be changed. There is always humidity in the air. As you read this you are looking through it because it is not condensed. We can see clouds because they are condensed. The vacuum pump is always pumping humid air and it has to go through the filter and out the exhaust ports of the pump. You cannot see it because it is not condensed. There will always be some condensation when you stop the pump and it cools. One pump manufacturer suggests a 15 minute off-delay timer to allow the pump to dry before it is shut off. The proper way to use a vacuum pump is to have it running continuously and either shut vacuum off using a valve on the inlet side, or divert the inlet to an accumulation tank. The advantage of an accumulation tank is that some condensation and oil will drop out there and you can drain it. Vacuum pumps will condense when they cool. If you are seeing a lot of condensation in the filter, it may be coming from the piping. It is important to have the piping running up before the filter on the pump, and have a drainable sump in the line. This may also catch overspray sucked by the vacuum. We are now using an oil/fat separating type filter before the pump. I think the only way to check for moisture loss is by weight of what goes in versus what comes out. Trying to dry a sample may not work because the oil may evaporate as well as water.
Where to put your vacuum coater
Despite what “they” say, if you are adding less than 30% liquid, you have the option of putting the coater after the cooler. You don’t have to accept that “after the dryer it absorbs better”. If you are going over 30%, I would suggest after the dryer. If you have doubts, use our demo unit and confirm. We have produced many tonnes after the cooler. If you have problems with high temperature of pellets, then cool them all the way with one cooler and let the vacuum work for you. If you have a lot of product less than 10%, you will get better appearance on cool pellets. For petfood I would always recommend after the cooler. We do not break pellets, so you can put us above the bagger. There have also been questions about dust and the need for screening before bagging. The double rotor mixer does put a lot of movement into the pellets – that’s what makes it work. If you leave the mixer running all the time, it can increase dust. In our control systems, the mixer only runs while putting on the liquids and discharging. Another source of dust could be sharp edges or small protrusions on the pellets. These can be removed during screening if you use a rotary screen like the EBM (www.gentleroll.com) to condition the pellets.
What we do with your information moving forward
Any information you provide to us it held in confidence. We have confidentiality agreements with all employees and critical vendors for your protection.
- The dry pellet weight per hour is divided by 0.8 to arrive at a design weight. The reason for the upsize is that we must stay ahead of the extruder, and all calculations are not exact science so it allows for some variances. Example: 8000 kg divide by .8 = 10000 kg design.
- The design weigh is divided by the bulk density to arrive at volume. Example: 10,000 kg divide by .5 bulk density = 20,000 litres.
- Based upon the number of liquid applications, we will estimate a cycle time. The volume divided by cycle gives us the size of mixer. Example: Cycle 4 minutes = 15 per hour. 20,000 divide 15= 1333 litres per batch. Nearest standard 1500 litres.
- From the size we will probably know from experience the size of vacuum system we need. If we don’t know, we will calculate later.
- The batch size is converted to weight, and divided by the reciprocal of the total liquid. Example: 1500 litres x .5 = 750 kg. If the total liquid is 30%, we would divide x .7 = 1071 kg finished weight.
- From the finished weight we calculate the volume of the liquids, size tanks, pipes, valves, sizes of load cells. From viscosities we determine the types of valves we need. Piston valves are the preference because of the higher number of cycles as compared to ball valves, but are limited in viscosity and size.
- We continue to determine all the details, and once we are sure we can handle the liquids in the time cycle or have adjusted the time cycle, then we re-check the mixer sizing and determine vacuum sizing.
- The feed hopper is sized with the size of valves. We continue to develop a schematic and estimate.